
Chevy Small Block Teardown & Rebuild
This project was done in an Automotive Mechanics class in my highschool. I was given the opportunity to teardown a 1995 Chevy 350 small block down to its iron block. The knowledge this project gave me of how an engine's mechanical components work was unparralelled to any diagram or article I've ever studied before.
As you scroll down there is a step by step process of what I did to tear down and rebuild the entire motor.

Teardown: Valves, Rocker arms, Pushrods, and Cylinder Head
First I started with the teardown of the intake and exhaust valves and their corresponding rocker arms and pushrods that they work in tandem with. The primary purpose of this system is to mechanically open the intake and exhaust valves based upon the timing of the camshaft's pressure against each individual valve. I.E they all go off at different intervals to open exhaust and intake valves to the cylinder at different intervals.
After this, you must remove all the bolts holding the entire cylinder head onto the block, do this with care because the cylinder head weighs around 50 lbs and can easily drop onto a foot if you are not prepared.
Teardown: Crankshaft
Next, you must remove the oil pan(not shown) to expose the crankshaft and all its counter weights. First you must remove all the bolts holding the crankshaft to the block via the main bearing caps. Next, by rotating the crankshaft via a large wrench, you can individually remove each piston's rod cap which holds it to the crankshaft. This process must be done with care as you don't want piston rods to get stuck underneath the crankshaft as you remove them. If this happens it can get in the way of turning the crankshaft to access other pistons' rod caps. After this, the crankshaft can be simply lifted out of place exposing all of the remaining piston rod


Teardown: Piston removal
After disconnecting each rod piston cap from the crank shaft. With the use of the butt end of a hammer, you must hit the big end of the piston rod to kick the piston out of the cylinder wall and it will fall below.
Teardown: Camshaft and Flywheel removal
After removing the 3 bolts holding the flywheel to the camshaft, as seen in the picture, the flywheel may be taken off along with the chain. After this step is complete, the camshaft may be carefully pulled out of the engine block. Care should be taken here as you do not want to ding up the camshaft against the block.
At this point the block is fully dissassembled.
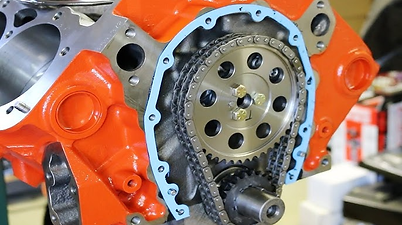
Not my photo, easy view of flywheel on top and crankshaft on bottom.
Rebuild: Camshaft, & Crankshaft replace
The first step in the rebuild process was to put the camshaft and crankshaft back into the block the same way they were placed. Again, be careful with the camshaft so it doesn't ding up against the sides.

Not my photo, easy view of crankshaft placed without pistons installed yet
Rebuild: Pistons with ring compressor
Now, you must put the pistons back into the cylinder wall and attach it to the crank shaft. The first step is to use a piston ring compressor to compress all the rings back into the piston, otherwise they stick out and would normally get in the way of putting the pistons on. The design of this is to allow for a complete seal once the ring is on the cylinder wall, but it will take force to get in. Next, place the piston rod into the cylinder and line up the piston against the outside, it should sit flush but not go in. With a strong hit from the butt end of a hammer, the piston should pop back into the cylinder wall. You can keep tapping it further into the cylinder until it lines up with the crankshaft. With the bearing insert attached to the big end, it should line up with the rod bearing journals on the crankshaft and it can be fit snug in place with a few more taps.

Not my photo, The silver is the piston about to be pushed in by the orange hammer. The black ring is the device used to hold the piston rings in place.

This is a phot of a piston with its rings. You can see how the rings stick out naturally which is why there's the need for the compressor to be used before it goes into the cylinder.
Rebuild: Camshaft and Flywheel Timing
Most flywheels come with a notch to signify the top of the rotation and it should be aligned accordingly with the camshaft's notch. This is to ensure that the intake and exhaust vales are timed correctly with the piston order. To ensure this, make sure the first piston is in top dead center(TDC). Next, you can insert the valves back into their holes on the other side of the engine block. Line up the crankshaft and camshaft so that both notches are lined up. This can be tricky as since the camshaft to crankshaft ratio is 1:2, there are two positions where the valves are fully closed. Personally, I ensured I was on the correct rotation of the camshaft by checking which valve opens as I over-rotated past the notch. The correct valve being the air intake valve on piston 1 opening first. Now with both camshaft and crankshaft timed, you can put on the flywheel and its chain.

Rebuild: Setting Valve-lash, while replacing pushrods, and rocker arms
The final step of the engine rebuild and often the most overlooked. First, replace the pushrods and rocker arms the same way that they were originally put, however, keep the nut on the rocker arm snug but not tight. The next step is setting valve-lash, which essentially is ensuring that each pushrod has a snug fit on the valves to the rocker arms. If you fully tightened the pushrods down now, you could bend the pushrods when you crank the crankshaft as some of the pushrods are lower than the other based upon valve position while being fully tight. Setting valve-lash in the way I did it is as follows: you must rotate each pushrod in your fingers and lightly tighten it until it doesn't twist anymore. Do this to all pushrods. Then turn the crankshaft 90 degrees. Now some of the pushrods will be loose as space was given by the valves, so you must repeat with the twisting and tightening. The rotating of the rod in your fingers is to get a feel for how snug it is. Repeat until you have made a full revolution of the crankshaft. Now all pushrods will be snug in all positions of the valves. You can see how overtightening before rotating the valves could easily bend a pushrod, I know because I did that :D
This 1995 Chevy Small Block is now fully rebuilt.
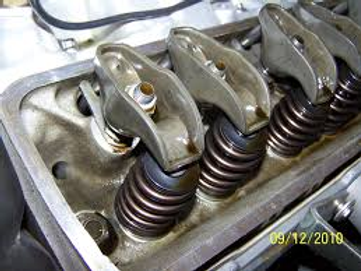
This is a closeup of the rocker arm, the boat shaped piece, the pushrod is above going towards the valves on the camshaft, and the spring is on the bottom to move the valves inside the cylinder head.

This is a photo of someone setting valvelash on the same Chevy 350 block. You can see him twisting the rod with his fingers while he simultaneously tightens the poly lock nut.